This is a blog just to help remember commands to use on amazon linux 2023 ec2 instance.
- ssh and connection helpers
ssh -i /path/to/your-key-pair.pem ec2-user@your-instance-public-dns-or-ip
for example
ssh -i "my_test_instance_key.pem" ec2-user@ec2-54-167-250-253.compute-1.amazonaws.com
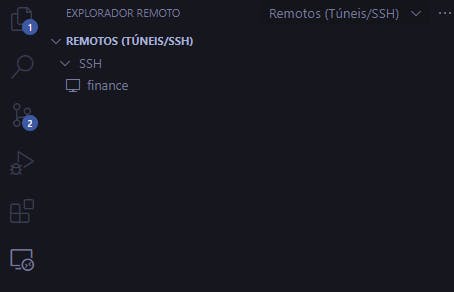
you can use the extension REMOTE SSH on vscode to help you open a vscode inside the instance, use CTRL+SHFT+P in vs code and write (ssh config) choose the first option it will open a file, inside this file add this line
Host <identifier_name>
  HostName <your_ec2_host>
  User <your_ec2_user>
  IdentityFile <path_to_key_file>
for example
Host finance
  HostName ec2-54-167-250-253.compute-1.amazonaws.com
  User ec2-user
  IdentityFile "~/.ssh/my_test_instance_key.pem"
then just hover over the application name and connect to it

you can open a terminal create a folder with a file and write to the file and see it on vscode
mkdir my_folder
touch my_folder/some_random_text.txt
ls
cd my_folder
you can open the file in vscode with
code --reuse-window .
or just use nano or vim
nano some_random_text.txt
- installing nvm for nodejs version managing
you can change this step for what your app needs this is an example for nodejs.
start by installing nvm
sudo yum update -y
curl -o- https://raw.githubusercontent.com/nvm-sh/nvm/v0.39.1/install.sh | bash
source ~/.bashrc
nvm --version
then use nvm to install the node version you want and set as default
nvm install <node_version>
nvm alias default <node_version>
node -v
npm -v
- Getting your app files from local machine
so in a terminal localy you can use this command to send a folder to the instance.
ps: send just what you need, you can build the project before
scp -i /path/to/your/private-key.pem -r /path/to/local/file ec2-user@your-ec2-instance-ip:/path/to/destination
for example
scp -i my_test_instance_key.pem -r finance ec2-user@ec2-54-167-250-253.compute-1.amazonaws.com:~/
- Getting your app from git
sudo yum install git -y
git --version
git clone <app>
cd <app>
- installing docker, docker-compose and helper commands
sudo yum install docker -y
docker --version
sudo service docker start
sudo docker ps

sudo curl -L "https://github.com/docker/compose/releases/latest/download/docker-compose-$(uname -s)-$(uname -m)" -o /usr/local/bin/docker-compose
sudo chmod +x /usr/local/bin/docker-compose
docker-compose --version

sudo usermod -aG docker ec2-user
the last command adds docker to the permissions so we do not need to use sudo befor docker every time, you need to exit this terminal and enter again
docker ps
helper commands to clean stuff in docker, use carefully and check the command before using it, put the id of the specific container to affect just one
show all containers id, name and status
docker ps -a --format "table {{.ID}}\t{{.Names}}\t{{.Status}}"stop all containers
docker stop $(docker ps -a -q)remove all containers
docker rm $(docker ps -a -q)remove all images
docker rmi $(docker images -a -q)remove all volumes
docker volume rm $(docker volume ls -q)remove all networks
docker network rm $(docker network ls -q)remove all used unused Docker resources, including stopped containers, dangling images etc
docker system prune -ahelpers
  docker ps
  docker logs <container>
  docker exec -it <container> bash
- clean cache and open some space
sudo yum clean all
npm cache clean --force
docker system prune -a
- install nginx
sudo yum install nginx
sudo systemctl start nginx
sudo systemctl status nginx
this will add the nginx.config file if you want to edit it use and add the proxy use, and if you go to the browser and put the ip of the instance it will show nginx
sudo nano /etc/nginx/nginx.conf
change the server part to this, and change the <port> to the <port> of your app
    server {
        listen       80;
        listen       [::]:80;
        server_name  _; //add domain name
        location / {
            proxy_pass http://localhost:<PORT>;
            proxy_http_version 1.1;
            proxy_set_header Upgrade $http_upgrade;
            proxy_set_header Connection "Upgrade";
            proxy_set_header Host $host;
        }

    }
to check after editing the config file run if the file is not missing some brackets, and then restart nginx.
sudo nginx -t
sudo systemctl restart nginx
now if you go to the ip of the instance it should show your app
- add https with certbot
ps: you need to have your domain and pair it with the instance
sudo python3 -m venv /opt/certbot/
sudo /opt/certbot/bin/pip install --upgrade pip
sudo /opt/certbot/bin/pip install certbot certbot-nginx
sudo ln -s /opt/certbot/bin/certbot /usr/bin/certbot
sudo certbot -n -d <your_domain> --nginx --agree-tos --email <your_email>
sudo systemctl restart nginx

#if you want to automate renew
sudo certbot certificates
sudo crontab -e
0 0,12 * * * certbot renew --quiet --no-self-upgrade
add pm2 to manage server (it helps the server re run if the instance closes)
 npm i pm2 -g
 pm2 start server.js
now to make this start always
pm2 startupcopy the result and run it
 pm2 save
 sudo reboot
 pm2 list
